
Walk into any coffee shop, open a package from a DTC brand, or attend a trade show — and you'll see them. Stickers. Not the cheap, curling-at-the-edges kind. The ones that feel substantial under your fingers, with colors that pop and edges cut so precisely they look like they grew out of the surface they're stuck to.
Custom stickers are quietly one of the highest-ROI marketing tools available to a small business. Here's why the math works:
They cost pennies. They deliver impressions for years. A well-made vinyl sticker stuck to a laptop or water bottle gets seen hundreds of times — by friends, coworkers, strangers in coffee shops. Compare that to a Facebook ad that disappears the moment your budget runs out. One thousand custom die cut stickers might cost you $150–$300. Spread across the hundred people who stick them somewhere visible, that's a CPM most marketers would trade their car for.
They turn customers into walking billboards. When someone puts your logo sticker on their gear, they're not just using your product — they're endorsing it. That's social proof you can't buy with ad dollars.
They make packaging feel premium. A simple kraft box becomes an experience when it's sealed with a custom logo sticker. For e-commerce brands especially, the unboxing moment is the first physical touchpoint your customer has with your brand. A cheap sticker says "we cut corners." A quality one says "we pay attention." Read our guide on using custom stickers for packaging and marketing for real-world examples.
But here's the part most guides skip: not all custom stickers are created equal. The difference between a sticker that lasts three years outdoors and one that peels off in three weeks comes down to material, adhesive, lamination, and cutting method. The next sections cover each of these in plain language — no industry jargon, just what you need to make a smart buying decision.
Jokeystickers fact: We've been manufacturing custom stickers for 24 years — learn more about our story. We don't resell someone else's production. We own our printing floor in Zhongshan, which means you pay factory-direct pricing instead of middleman markup.
Thinking about ordering stickers for your brand? Tell us about your project → We'll respond with a free quote and material recommendation within 24 hours — no obligation.
The material you choose determines everything: how your sticker looks, how long it lasts, where you can stick it, and what it costs. Here's the straightforward breakdown.
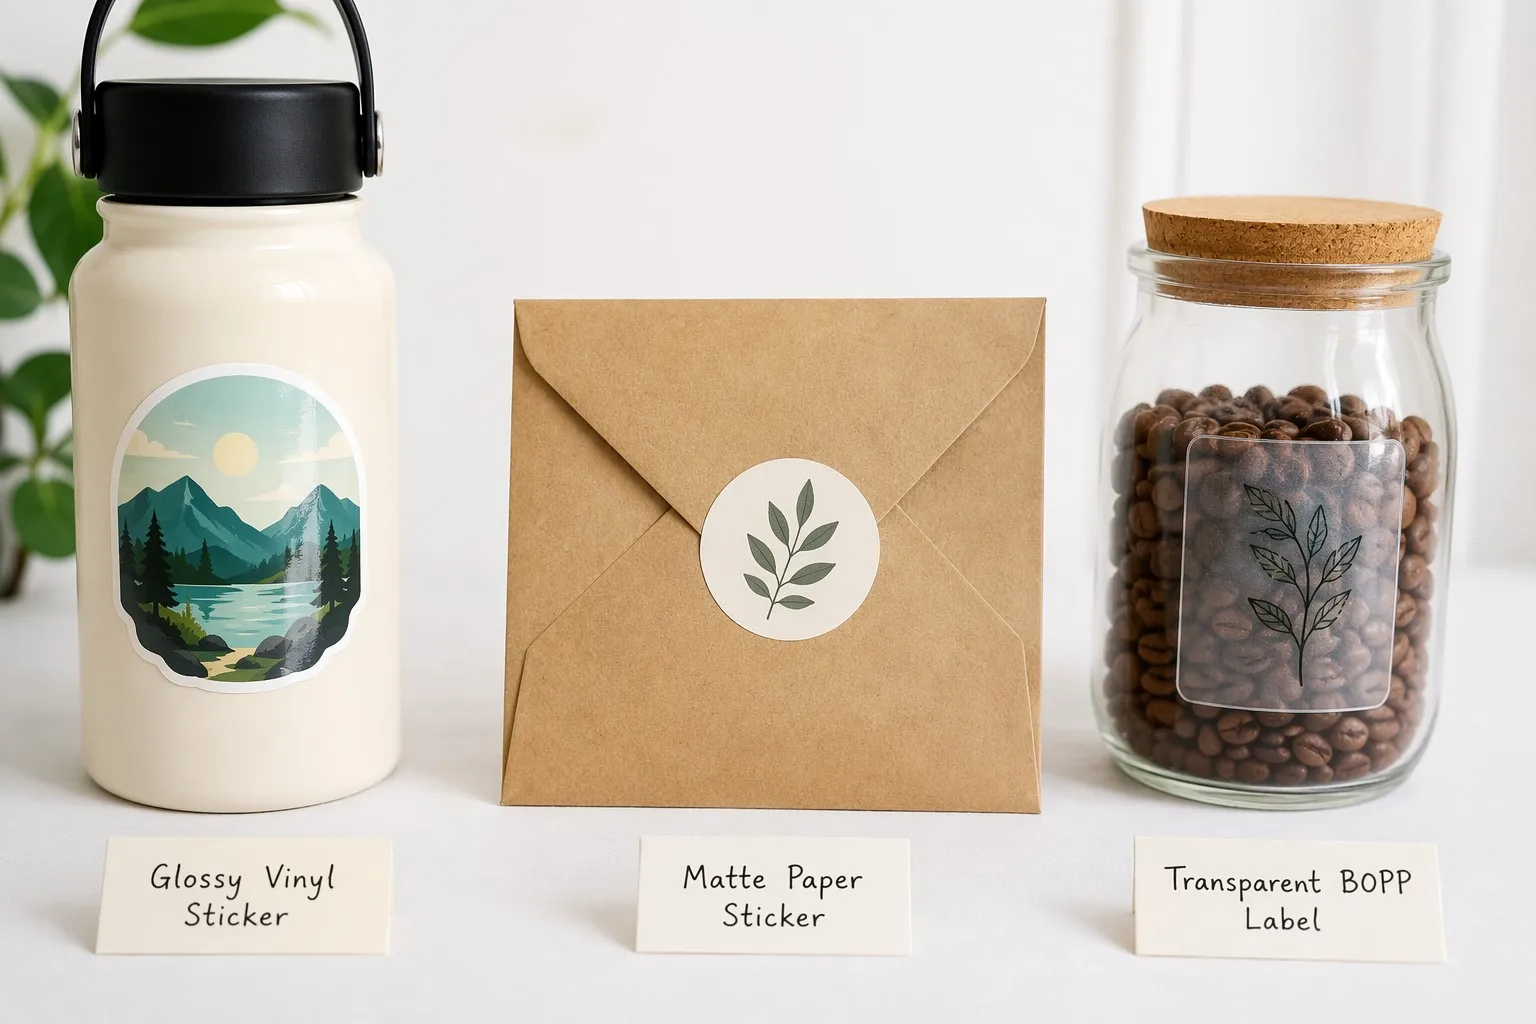
Vinyl is the workhorse of the custom sticker world. It's a synthetic plastic-based material that can handle rain, sun, scratches, and temperature swings without breaking down. Browse our vinyl sticker options →
Best for: Outdoor use, product labels on bottles/jars, laptop stickers, car decals, any application where durability matters.
Pros: Waterproof, UV-resistant (with lamination), flexible, long-lasting (3–5+ years outdoors with proper lamination). Available in glossy, matte, and specialty finishes.
Cons: Slightly more expensive than paper. Not biodegradable.
Cost range: $0.10–$0.40 per sticker depending on size, quantity, and finish.
Related: Are Vinyl Stickers Waterproof and Weatherproof?
Paper stickers have a natural, tactile feel that vinyl can't replicate. They're the go-to for short-term or indoor applications.
Best for: Price tags, event giveaways, indoor packaging, temporary labels, envelope seals.
Pros: Lower cost, natural matte appearance, easy to write on, some eco-friendly options available (FSC-certified paper, recycled stock).
Cons: Not waterproof, tears easily, fades in direct sunlight, shorter lifespan (6–12 months indoors).
Cost range: $0.05–$0.20 per sticker.
BOPP is a film material that sits between paper and vinyl. It's waterproof like vinyl but thinner and often more affordable. If you've ever peeled a label off a beverage bottle, you've handled BOPP. Read our deep dive on BOPP material →
Best for: Product labels that need water/oil resistance without the thickness of vinyl. Food packaging, beverage bottles, cosmetic labels.
Pros: Waterproof, oil-resistant, thinner profile, high clarity for transparent labels, food-safe options available.
Cons: Less durable than vinyl for outdoor use, can feel "plasticky" to some customers.
| Material | Best Use Case | Standout Feature |
|---|---|---|
| Holographic | Brand merchandise, limited editions | Rainbow shimmer effect that shifts with light |
| Glitter | Cosmetic brands, kids' products | Sparkly, textured surface |
| Foil (Gold/Silver) | Premium packaging, luxury brands | Metallic sheen, high-end look |
| Clear/Transparent | Glass bottles, minimalist packaging | "No-label" look — design floats on the surface |
| UV/Glow | Event merch, nightlife brands | Glows under black light |
Related: Best Sticker Material for Small Business Packaging — Full Guide
Not sure which material fits your project? We'll send you a free sample kit with actual vinyl, paper, and BOPP stickers so you can feel the difference before ordering. Request your free sample kit →
Once you've picked a material, the next decision is how your stickers get cut. This affects how they look, how people peel them, and how many designs fit on a single order.
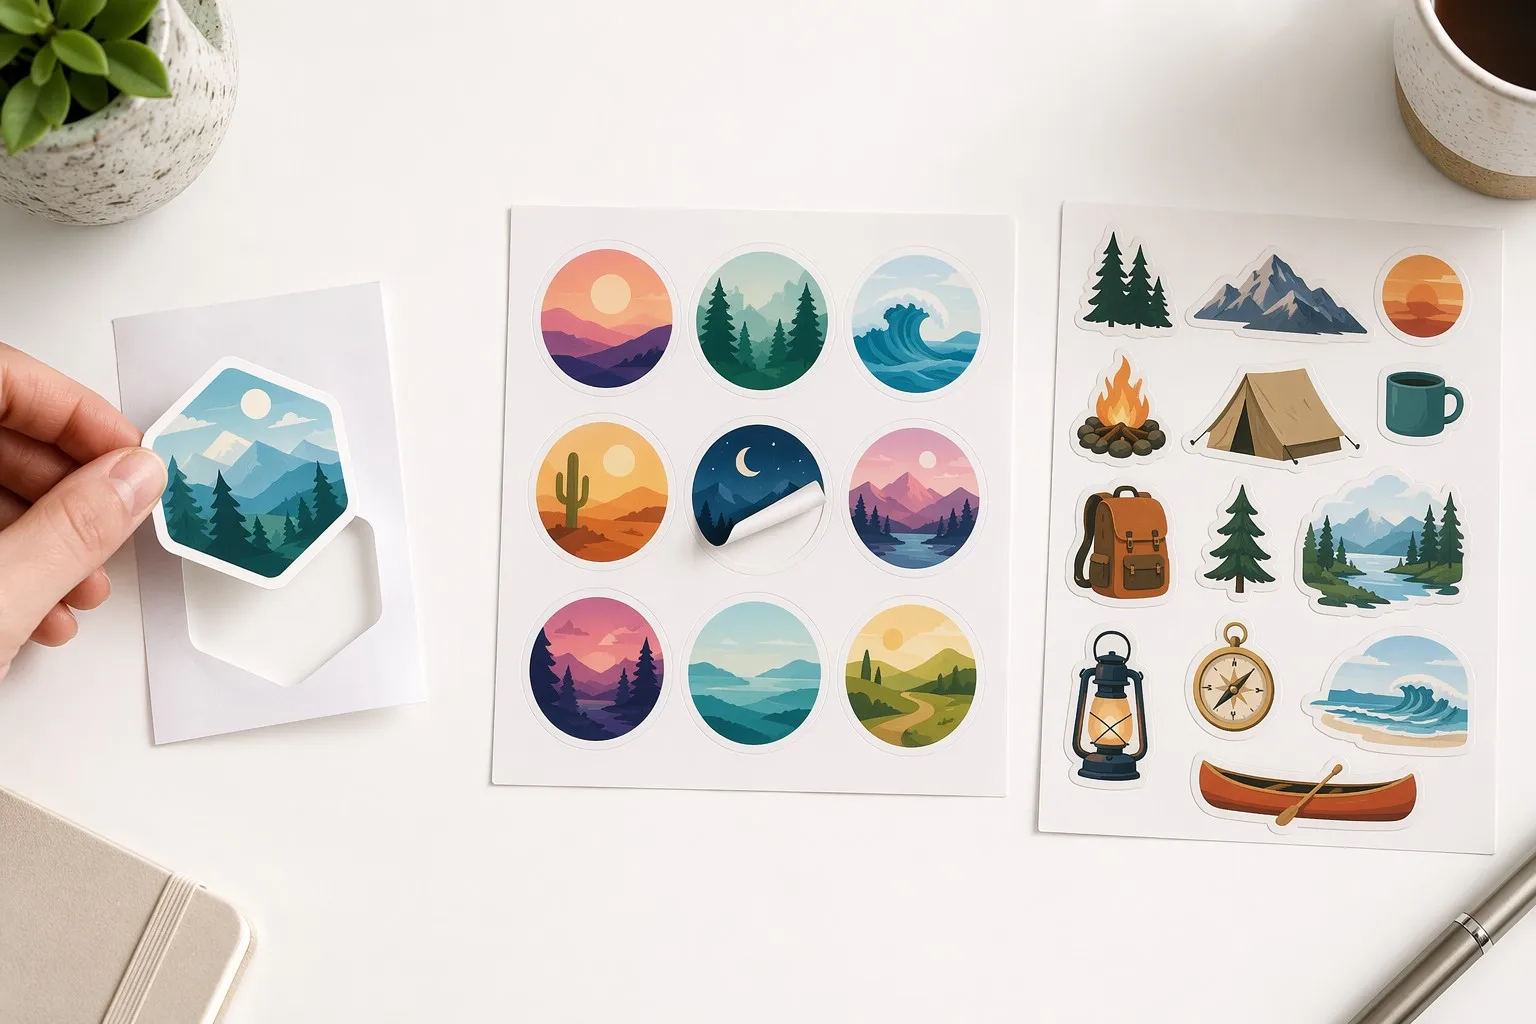
A die cut sticker is cut all the way through the material and the backing paper, so each sticker is a standalone piece shaped exactly to your design outline. If your design is a star, the sticker is a star — no white border, no square background. Shop die cut stickers →
Best for: Logo stickers, brand giveaways, any design where the shape is part of the appeal.
Why businesses choose it: It looks professional. A die cut logo sticker on a laptop or product box says "we invested in this." The shape follows your artwork, so there's no wasted visual space.
Limitation: Because each sticker is individually cut, there's a minimum size (usually 1.5–2 inches at the narrowest point). Very intricate shapes with thin "arms" or "tails" may not hold up.
A kiss cut sticker is cut through the material layer but NOT the backing paper. The sticker stays on a shared backing sheet, and you peel each one off individually. Think of a sheet of band-aids — the cuts go through the bandage but the whole thing stays on one backing. Shop kiss cut stickers →
Best for: Sticker packs with multiple designs, retail packaging, situations where you want the protective backing until use.
Why businesses choose it: Efficient for multi-design orders. You can fit 6–12 small designs on one sheet. Easier to ship and display in retail.
Limitation: The backing sheet adds some bulk. Not ideal when you need individual loose stickers for handouts.
A sticker sheet is exactly what it sounds like — multiple stickers printed and kiss-cut on a single backing sheet. It's the format you see in planner stickers, kids' activity packs, and brand merch sets. Shop sticker sheets →
Best for: Sticker packs for retail sale, promotional kits, subscription box inserts.
Why businesses choose it: Maximum design real estate. You can create a themed set (e.g., a coffee brand's sticker sheet with latte art, beans, and logo variants). Great for retail display.
| Feature | Die Cut | Kiss Cut | Sticker Sheet |
|---|---|---|---|
| Backing | Individual | Shared sheet | Shared sheet |
| Shape | Custom outline | Custom outline | Multiple designs per sheet |
| Best for | Giveaways, logos | Multi-pack distribution | Retail, merch sets |
| Peel ease | Easy | Moderate | Moderate |
| Per-unit cost (bulk) | $ | $ | $$ |
Related: Die Cut vs Kiss Cut Stickers: Which One Does Your Brand Need?
Still deciding between die cut, kiss cut, or sheets? Tell us about your project — quantity, intended use, and budget — and we'll recommend the most cost-effective format. Get expert advice →
A great sticker design on your screen doesn't automatically become a great physical sticker. Printers and screens speak different languages. Here are the rules that prevent 90% of the problems we see in our factory.
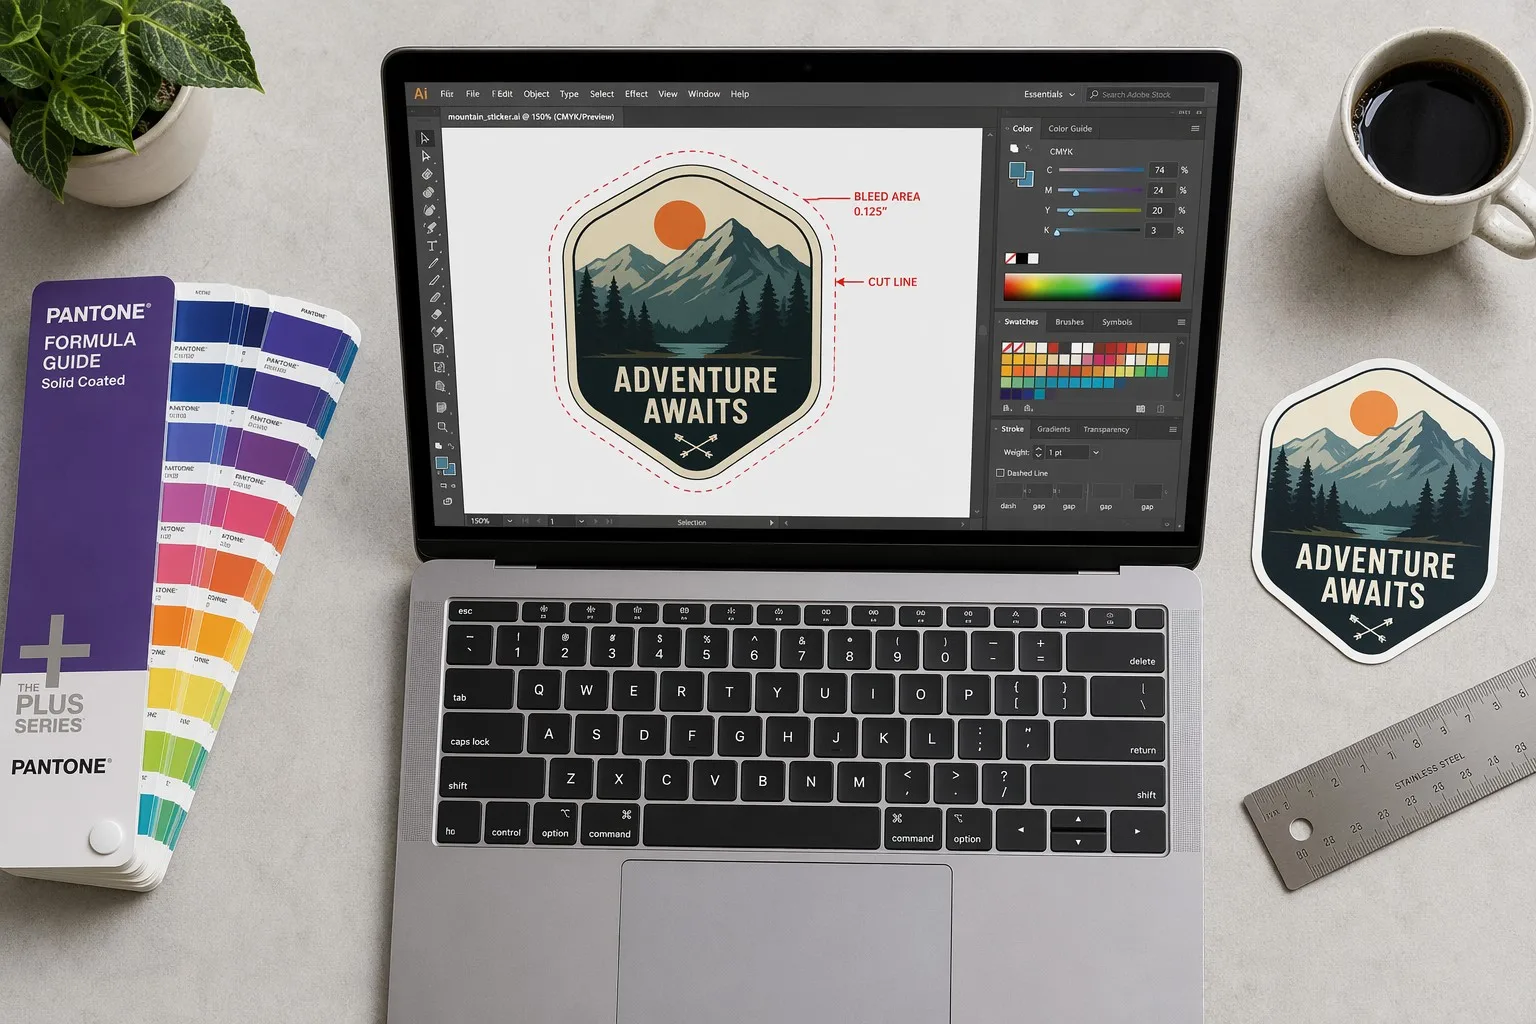
Your screen displays colors in RGB (red, green, blue light). Printing presses use CMYK (cyan, magenta, yellow, black ink). If you design your sticker in RGB and send it to print, the colors will shift — sometimes dramatically. Bright neon greens and electric blues are the biggest offenders.
What to do: Set your design file to CMYK color mode before you start. Adobe Illustrator, Photoshop, and even Canva Pro all support CMYK. If you absolutely need a specific brand color, ask your printer for a Pantone match (this costs more but guarantees accuracy). See our complete artwork guidelines →
Sticker printing requires 300 DPI (dots per inch) at actual print size. Lower than that, and your design will look soft or pixelated — especially on text and fine lines.
Quick check: Take your image dimensions in pixels and divide by 300. That's the maximum print size in inches. A 3000×3000 pixel design = 10×10 inches max at 300 DPI.
What looks crisp on a 27-inch monitor can become illegible at 2-inch sticker size. As a rule of thumb:
Related: Common Die Cut Design Mistakes (And How to Avoid Them)
Sticker pricing can feel random when you're comparing quotes. One printer quotes $80 for 500 stickers, another quotes $220. The difference usually isn't markup — it's in the specs. Here's what drives the price.
1. Quantity (The Biggest Lever)
Sticker printing has high setup costs and low per-unit costs. The first sticker in a run might cost your printer $5 to produce (file prep, plate setup, machine calibration). Sticker #2 through #5,000 cost pennies each.
A real example from our production line:
The lesson: if you think you'll need stickers again, order more upfront. The marginal cost of doubling your quantity is far less than doubling your budget. See our complete pricing guide →
2. Size
Stickers are priced by material area. A 4" × 4" sticker uses four times the material of a 2" × 2" sticker. Pricing scales roughly linearly with area.
3. Material + Lamination
Paper is cheapest. Vinyl costs more. Specialty materials like holographic or foil are the most expensive. Lamination (glossy or matte protective coating) adds $0.01–$0.05 per sticker depending on size but dramatically extends lifespan — well worth it for anything that'll see moisture or handling.
4. Cutting Complexity
A simple circle or rectangle is the cheapest to cut. A detailed custom shape with intricate curves and tight corners costs more — it requires a custom die and slower cutting speeds.
This is where most small businesses leave money on the table. Many "custom sticker" websites are not manufacturers — they're resellers. They take your order, send it to a factory (often the same type of factory we operate), then mark it up 40–100%.
Factory-direct means:
Related: How to Estimate Custom Sticker Costs Before Ordering | Why Factory-Direct Matters →
Ready for a quote? Send us your artwork (or even a rough sketch), tell us the quantity and material preference, and we'll get back to you with factory-direct pricing in under 24 hours. Get your free quote now →
After 24 years in sticker manufacturing, we've seen every ordering mistake that exists. Here's a process that works.
Write down three things before you contact any printer:
These answers determine material, lamination, and adhesive — so you don't get upsold on features you don't need or undersold on durability you do need.
Use the design checklist from the section above. If you don't have a finalized design, a good printer can work with a rough concept and help refine it — but expect to pay a small design fee if you need professional artwork creation. Read our full artwork specification guide →
Never commit to a large order without seeing physical samples. Colors shift from screen to print. A material described as "glossy" by one printer might look completely different from another printer's "glossy."
At Jokeystickers, we offer free samples before production runs. We'll print a few of your stickers at actual size, on your chosen material, and ship them to you. You confirm the look and feel, THEN we run the full order.
| Order Size | Typical Production Time | Standard Shipping (US) |
|---|---|---|
| < 1,000 stickers | 3–5 business days | 5–10 business days |
| 1,000–10,000 stickers | 5–7 business days | 5–10 business days |
| 10,000+ stickers | 7–12 business days | 5–10 business days |
Rush production is usually available for an additional fee — just mention it when you contact us.
Your printer should send a digital proof before production. Look at it on a large screen — not your phone. Check:
You're not just buying stickers. You're buying a marketing asset that works for your brand 24/7, on laptops and water bottles and packages across the country.
Jokeystickers has been manufacturing custom stickers for 24 years. We're a factory, not a middleman — which means you pay factory-direct pricing, get free samples before production, and work directly with the team that prints your order. We hold eight international certifications including ISO, FSC, UL, REACH, and more — and handle the entire process in-house, from file setup to final packaging.
Free samples · 72-hour turnaround · No middleman markup
Upload your design or describe your idea — we'll handle the rest.
Request Your Free Quote →Or explore our most popular sticker types:
Die cut stickers are cut through both the sticker material and the backing paper, producing individual stickers shaped to your design. Kiss cut stickers are cut only through the material layer, leaving the backing paper intact — so multiple stickers share one backing sheet. See our detailed comparison with photos →
Vinyl with UV-resistant lamination is the best choice for outdoor durability. It's waterproof, resists fading from sun exposure, and can withstand temperature extremes. Paper and unlaminated stickers will degrade quickly outdoors. Browse our outdoor-ready stickers →
Custom sticker pricing depends on four factors: quantity, size, material, and cutting complexity. In bulk (1,000+), standard vinyl die cut stickers typically cost $0.07–$0.25 per sticker. Smaller quantities cost more per unit due to setup costs. Read our complete pricing breakdown →
Vector files (AI, EPS, PDF) are preferred because they scale without quality loss. High-resolution PNG files (300+ DPI at actual print size) with transparent backgrounds also work well. Avoid sending JPEG files for designs with text or sharp edges — compression artifacts will show in print. See all accepted file formats →
Yes, and you should. At Jokeystickers, we provide free physical samples printed on your chosen material before running full production. This lets you verify colors, material feel, and adhesion before committing to a volume order. Request your free sample →
This varies by printer. Many resellers enforce high MOQs (500–1,000 minimum). As a factory-direct manufacturer, Jokeystickers offers flexible minimums — contact us with your requirements and we'll work with you on quantities that make sense for your budget.
Typical production time is 3–7 business days, plus 5–10 business days for standard shipping to the US. Total turnaround from order to delivery is usually 2–3 weeks for standard orders. Rush production is available — ask us about expedited timelines.
We offer FSC-certified paper stock and are actively expanding our sustainable material options. For brands with specific sustainability requirements, contact our team to discuss material alternatives. View our certifications here.


